Muffin Topped
Posted: September 12, 2013 Filed under: baked goods, eggs! | Tags: bacon, bananas, breakfast, chocolate, eggs, food, muffins, recipes 11 CommentsRemember those breakfast cereal commercials from the 80s? Anyone who sat around in their pajamas in the wee hours of Saturday morning should know what I’m talking about. The announcer would always say: Part of a complete breakfast! And they they’d cut to a plate of toast and some random fruit next to the bowl of Frosted Flakes or Trix, as if eating bread and real fruit made the cereal better for you.
That story doesn’t really have anything to do with these mini muffins, because they don’t have cereal (although watch out of a future recipe that does). But they could be considered a complete breakfast. You’ve got your bananas, always a morning-time staple. You’ve got everyone’s favorite breakfast meat, bacon. And you’ve got chocolate for good measure. (Also cinnamon for that cozy kick.)
But here’s the real question:
Are these breakfast muffins masquerading as decadent little treats, or decadent little treats pretending to be — and doing a darn good job of it — breakfast food? I’ll let you decide.
Chocolate Banana Bacon Mini Muffins
2 ½ cups of flour
2 teaspoons of baking powder
1/4 teaspoon of baking soda
1 teaspoon of cinnamon
1/4 teaspoon of salt
½ cup (1 stick) of unsalted butter, at room temperature
1 cup of sugar
2 large eggs
1 teaspoon of vanilla
4 ripe bananas, mashed
1/3 cup of milk chocolate chips
6 slices of bacon, cooked & crumbled
Maple Sugar Camp Mix
Heat your oven to 400º.
In a medium bowl, mix together the flour, baking powder, baking soda, cinnamon and salt. Set aside.
In a large mixing bowl, cream the butter and sugar until light and fluffy. Beat in the eggs one at a time, and then add the vanilla. Add the flour mixture a little at a time until well combined, scraping down the sides as needed. Beat in the mashed bananas, and then stir in the chocolate chips and crumbled bacon. (Or: If you want non-bacon eaters to enjoy them, divide the batter in half and only put bacon in some of it.)
Lightly grease a mini muffin pan and then spoon batter 3/4 of the way into each cup. Sprinkle each with Maple Sugar Camp Mix, and then bake for 12 to 14 minutes, until puffed and lightly browned. Let them cool completely in the muffin pan. Then remove muffins and enjoy.
Crumby Scrambled Eggs
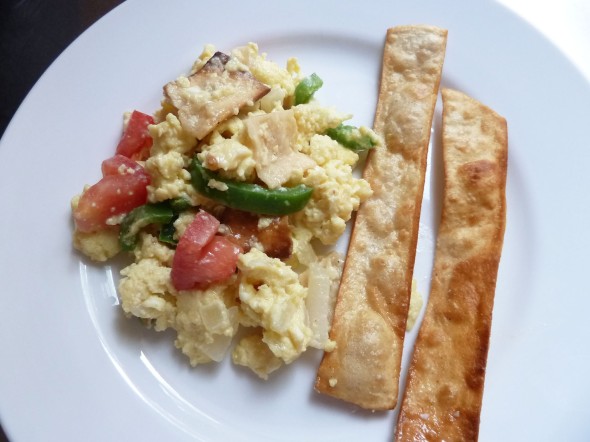
Posted: August 19, 2013 Filed under: eggs!, veggies | Tags: easy, eggs, food, jalapeno, meatless monday, migas, recipes, scrambled, tex-mex, tortillas 3 CommentsNow, don’t go thinking that I’m putting my egg-making skills down today. Because I’m not. It’s crumby, not crummy. Crumby as in crumbs. Crumby as in, “Oh, these fried tortilla crumbs certainly add a lot of texture and flavor to these scrambled eggs.”
What? You’ve never mixed fried tortillas into your scrambled eggs? Then you, my friend, have never had migas, a popular breakfast dish found throughout Texas. Migas translates to crumbs (see!) and the crumbs give the eggs a crunchy texture. You can by all means take the lazy way out and use store-bought tortilla chips. But where is the fun in that? Wouldn’t you rather gently fry your own corn tortilla strips in a nice hot skillet? Then you can season them up with anything you like. There’s nothing crummy about that whatsoever.
Migas, aka Tex-Mex Scrambled Eggs
For the fried tortillas strips:
6 corn tortillas
4 tablespoons of vegetable oil
Sea salt
For the eggs:
½ yellow onion, diced
1 large jalapeno, diced
4 eggs
2 tablespoons of milk
1/4 cup of shredded Monterey Jack cheese
1 plum tomato, diced
Jalapeno (or habanero) hot sauce
Salt and pepper
Salsa (optional)
Cut the corn tortilla into ½ inch strips. Add the oil to a large cast iron skillet and heat on medium-high. Working in batches, add the tortilla strips and lightly fry on both sides until golden brown. Place on a paper towel-lined plate and lightly season with sea salt.
Drain some of the oil from the skillet, lower the heat to medium-low and add the onions and jalapeno. Cook until soft, about 5 minutes. In a bowl, lightly whisk together the eggs and milk, and season to taste salt and pepper plus a few dashes of hot sauce. Add the eggs to the skillet and cook, constantly stirring, until the eggs are the consistency you prefer. Stir in the cheese, and then about 6 strips of torn fried tortillas, and cook for 1 minute until the cheese is melted and the tortilla pieces are slightly soft. Off the heat, stir in the diced tomato. Plate the eggs, garnish with extra tortilla strips and salsa, and eat.
Frittering Around
Posted: August 5, 2013 Filed under: apps & snacks, eggs!, sides & soups, veggies | Tags: appetizers, corn, corn fritters, eggs, food, meatless monday, recipes, side dishes, snacks, summer food, vegetarian 15 CommentsYou know what I like? Lazy Sundays. When there’s nothing on your schedule, you’re free to catch up on crappy TV or read a good book (or a good-bad book) or leisurely make yourself dinner.
You know what’s easy? Removing kernels from a cob. I know they make gadgets that do that now, but why bother? A knife will do just fine. Plus, it’s very satisfying running your knife down the side of an ear (that sentence sounds scarier than it actually is, btw) to make little strips of kernels fall off.
You know what’s weird? Those little white hairy threads that you find between kernels of corn.
You know what’s really tasty? Hot corn fritters with lime aioli on top. If you’ve ever squeezed fresh lime juice on your salt and peppered corn, you’ll understand how awesome and refreshing a combo that can be.
Corn Fritters with Lime Aioli
For the fritters:
½ cup of flour
1 teaspoon of baking powder
1/3 cup of 2% milk
1 egg, lightly beaten
1 ½ cups of fresh corn kernels (about 2 to 3 ears of corn)
½ cup of scallions, finely diced
Pinch of red pepper flakes
Salt and pepper
Vegetable oil
For the aioli:
3 tablespoons of mayonnaise
2 tablespoons of lime juice
1 clove of garlic, minced
In a mixing bowl, combine the flour and the baking powder. Add the milk and egg and whisk until smooth. Add the corn, scallions, red pepper flakes and 1/4 teaspoon of both salt and pepper. Chill in the fridge for about 10 minutes.
Heat a tablespoon of oil in a large nonstick skillet over medium heat. Drop 1/4 cups of batter into the skillet (don’t overcrowd the skillet) and cook until the top bubbles and the edges are golden, about 2 minutes. Flip the fritters and cook another 2 minutes or until golden. Place on a paper towel-lined plate and set aside. Continue with the additional batter, adding more oil as necessary, until all the fritters are fried.
To make the aioli, combine the mayo, lime juice and minced garlic in a small bowl. Top with each fritter with a dollop of aioli.
Midweek Meltdown: Blackberry Ice Cream
Posted: July 17, 2013 Filed under: desserts, eggs! | Tags: berries, blackberries, eggs, food, frozen treats, ice cream, recipes, summer food 11 CommentsIt continues to be hot. Like H-O-T hot. I feel like I’ve been melting, or on the verge of melting, for weeks. Which is good and bad when ice cream is involved. You want your ice cream cold and tasty, but not too cold that you can’t eat it without a dreaded brain freeze. And then you don’t want it too melty so it turns into a big drippy mess and gets all over your face and clothes, or whatever else happens to be around, like your iPhone, or your cat.
These are the things I was thinking about when I was making my latest batch of ice cream. This time I’ve gone the fruity route, using blackberries, those darker, richer cousins of raspberries and strawberries.
I really love the color of this ice cream, it’s such a happy purple. It just makes me smile. It’s like staring into a bowl of Grimace or something. Wait, is that weird? Forget I said that. The heat has gotten to me. It’s nothing like a bowl of Grimace. It’s sweet and creamy and berry good … and might just be one of the tastiest varieties I’ve made.
Blackberry Ice Cream
2 pints of blackberries
1 1/4 cups of sugar
2 tablespoons of lemon juice
3 cups of half & half
5 large egg yolks
In a medium saucepan, combine the blackberries, 1/4 cup of sugar and the lemon juice. Simmer over low heat until the blackberries have broken down and are syrupy, about 20 minutes. Next, pour the mixture through a fine-mesh strainer into a large bowl, using a spoon or spatula to get as much of the liquid through as possible. Discard the remaining pulp and seeds and let the liquid cool.
In another saucepan, heat 1 ½ cups of half & half and 1 cup of sugar over medium-low heat. Meanwhile, whisk the egg yolks in a bowl until pale yellow and thick, about 3 minutes. Gradually add some of the warm half & half mixture into the egg yolks while whisking constantly. Then pour the egg-half & half mixture into the saucepan and continue cooking over low heat, stirring constantly, until the mixture thickens and can coat the back of a wooden spoon, about 5 minutes.
Add the remaining 1 ½ cups of half & half to the blackberry mixture, and then add the egg-half & half mixture and stir to combine. Cover with plastic wrap and refrigerate until cold or overnight.
Place the mixture into your ice cream maker and freeze according to the machine’s instructions. Most machines take 20 to 40 minutes to make ice cream. When the ice cream is thick and creamy, place into a freezer-safe container (with piece of parchment paper between the ice cream and the lid) and let it harden for a few hours.
Let it sit at room temperature for a few minutes before scooping, and then eat.
Midweek Meltdown: Frozen Key Lime Pie
Posted: June 5, 2013 Filed under: desserts, eggs! | Tags: dessert, eggs, food, frozen treats, key lime pie, lime, pie, recipes, summer food 11 CommentsWhile technically not ice cream, this pie IS frozen, and basically has the same ingredients as ice cream, so I’m qualifying this as a meltdown. And even for people who don’t like pie (this guy) this one is a real treat. I’ll let you in on a little secret too — I’m spilling a lot of them this week — I don’t use regular graham crackers for the crust. I use honey-flavored Teddy Grahams. So, I throw those poor innocent bears into a food processor and pulverize them into little crumbs. If that offends anyone, I’m sorry. But just like the brave limes in this pie, they really do sacrifice their lives for a good cause. As a result, this frozen pie has all the necessary flavors of the perfect summer dessert: zesty, creamy, sweet and, if you leave it out in the sun for too long, melty.
Frozen Key Lime Pie
For the crust:
2 cups of graham cracker crumbs
6 tablespoons of butter, melted
For the filling:
6 large egg yolks
1/4 cup of sugar
1 14 oz can of sweetened condensed milk
2 tablespoons of lime zest
3/4 cup of lime juice (about 4 to 5 limes)
For the topping:
½ pint of heavy cream
3 tablespoons of sugar
½ teaspoon of vanilla
Heat your oven to 350º.
For the crust, combine the graham cracker crumbs and melted butter in a bowl. Press into a 10 inch pie dish, making sure the sides and bottom are even thickness. Bake for 10 minutes, and then allow to cool completely.
For the filling, beat the egg yolks and sugar on high until thick, about 5 minutes. On medium speed, add the sweetened condensed milk, lime zest and lime juice. Pour the mixture into the baked pie crust, cover with foil and let freeze overnight.
For the topping, beat the heavy cream on high until soft peaks form. Add the sugar and vanilla and beat to combine. Spoon over the top of the pie and allow to freeze several hours. Cut into slices and then eat.
