Christmas Cookie Roundup
Posted: December 23, 2013 Filed under: cookies, desserts | Tags: chocolate, Christmas, classic, cookie bars, cookies, cream cheese, food, Holidays, peanut butter, recipes, spritz 8 Comments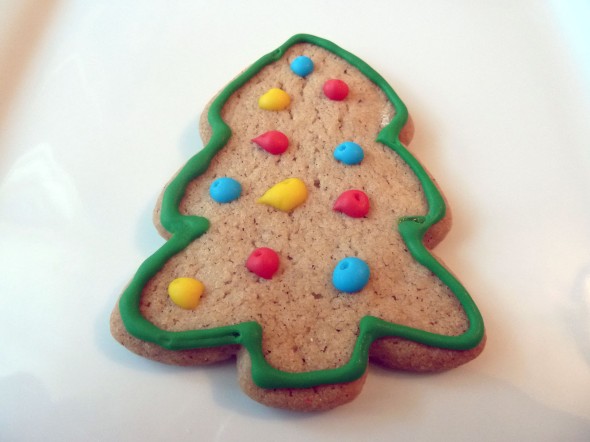
sugar & spice
Even though today is Christmas Eve Eve, it’s not too late to make some Christmas cookies. Here are some of my favorites that I’ve made over the past few years. (Click on the photo for the recipe.)
Hello Dollies (aka Magic Cookie Bars) – so many delicious layers
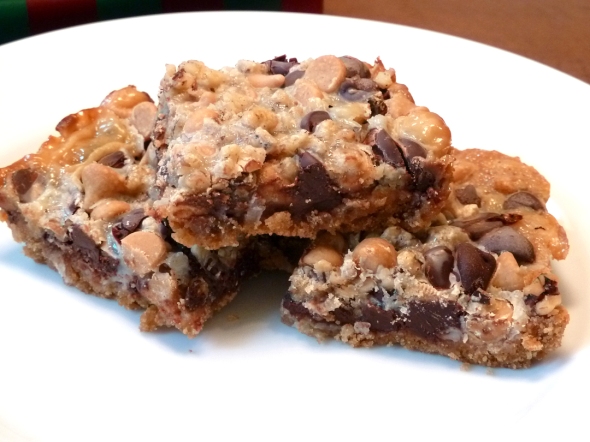
check out all those layers
Cream Cheese Spritz Cookies – get your (cookie) gun

trim the tree
No-Bake Chocolate Clusters – there’s literally no baking involved; just melt, mix and set

no bake, no fuss
Merry Christmas, everyone!
Christmas Cookie Day: Toffee Bars
Posted: December 16, 2013 Filed under: cookies, desserts, eggs! | Tags: chocolate, Christmas, cookie bars, cookies, eggs, food, Holidays, recipes, sea salt, toffee 7 Comments
toffee time
These aren’t your typical Christmas cookies. But who says you need to be typical? The holidays deserve something special, and there’s something very special about toffee and chocolate and a few well placed flakes of sea salt.
Toffee Bars
1 ½ cups flour
½ teaspoon of baking powder
½ teaspoon of salt
1 ½ sticks of unsalted butter, at room temperature
3/4 cups of brown sugar
1 egg
½ vanilla
1/4 cup toffee bits
1 ½ cups of Heath candy bar bits*
½ teaspoon of flaky sea salt
Heat your oven to 325º.
In a medium bowl, mix together the flour, baking powder and salt. Set aside.
In a large mixing bowl, cream the butter and brown sugar until light and fluffy, and then add the eggs and vanilla. Add the flour mixture a little at a time until well combined. Stir in the toffee bits.
Lightly grease an 8×8 (or similar) baking dish. Line with parchment paper, leaving extra that hangs over the edge, and lightly grease the parchment. Spread the batter into the dish in an even layer. Bake for 35 to 40 minutes, or until a toothpick inserted in the middle comes out clean. Sprinkle the Heath bits over the top and bake a few minutes more until the chocolate is melted. Remove from the oven, sprinkle with the sea salt, and let cool completely in the dish. When cool, use the parchment paper to lift out the bars and then cut into squares. Then eat.
*I used 30 miniature Heath bars, which I unwrapped, placed into a large ziploc bag and then smashed with a rolling pin. It was very therapeutic.
Fudgy Center of Attention
Posted: November 18, 2013 Filed under: cookies, desserts, eggs! | Tags: chocolate, cookies, desserts, eggs, food, fudge, nuts, oatmeal, recipes, walnuts 9 Comments
just go nuts
If you’re a fan of oatmeal cookies, you’ll probably go cuckoo for these. If you’re a fan of walnuts (here, lightly toasted, pulverized and mixed into the dough), you’ll probably go nuts. And if you’re a fan of chocolate fudge, well, these cookies will probably make you flip out from happiness.
Because seriously, what’s not to like about a dollop of gooey fudge on top of a chewy, nutty cookie?
Nothing, that’s what.
Oatmeal Walnut Fudge Cookies
12 oz of shelled walnuts
2 cups of flour
1 teaspoon of baking soda
½ teaspoon of baking powder
1 teaspoon of salt
1 cup (1 stick) of unsalted butter, at room temperature
1 cup of brown sugar
½ cup of sugar
2 large eggs
1 teaspoon of vanilla
1 teaspoon of maple syrup
3 cup of rolled oats
1 14oz can of sweetened condensed milk
1 12oz bag of semisweet chocolate chips
Heat your oven to 350º.
Spread the walnuts on a rimmed baking sheet, and bake for 10 minutes, turning halfway through, until toasted. Grind them in a food processor until they’re about the size of mini chocolate chips. Remove all but 1/4 cup from the food processor and process until fine.
In a medium bowl, mix together the flour, baking soda, baking powder and salt. Set aside.
In a large mixing bowl, cream the butter and sugars until light and fluffy, then add the eggs, vanilla and maple syrup. Add the flour mixture a little at a time until well combined. Stir in the oats and larger walnut pieces.
In a small sauce pan, heat the condensed milk and chocolate chips over medium-low heat until chips are completely melted and the mixture is smooth. Keep on a low heat.
Drop small rounds of the dough onto a parchment-lined baking sheet. Flatten the center to form a nest, and then spoon a teaspoonful of the chocolate mixture in the middle. Sprinkle each with the fine ground walnuts. Bake for 12 to 15 minutes, or until lightly golden. Let cool on the baking sheet for a few minutes and then place a cooling rack. Then eat.
Midweek Meltdown: Dulce de Leche Ice Cream
Posted: July 31, 2013 Filed under: desserts | Tags: caramel, dulce de leche, food, frozen treats, ice cream, recipes, summer food 7 Comments
dulce delicioso*
Thankfully, the heat spell we’ve been having for the past so-many weeks has finally broken. (At least I hope so.) Now the days have settled into the very pleasant mid-80s, with a bright blue sky overhead and a gentle breeze sailing in from the ocean.
Sounds delightful, doesn’t?
As delightful as a bowl of dulce de leche ice cream.
If you’re not familiar with dulce de leche, it’s a caramel-like substance that’s very rich and creamy, but a little mellower than ordinary caramel. You should be able to find a can of it in the “international” aisle of your grocery store. But if not, there are a few methods out there where you can turn a can of sweetened condensed milk into dulce de leche. One of them involves boiling a can for 3 to 4 hours. While homemade stuff is great, boiling something for 4 hours when you can buy the stuff already in a can seemed like a silly idea. Plus, I didn’t want to ruin one of these very pleasant summer days stuck inside watching a pot boil. I much prefer devouring a bowl of creamy ice cream instead.
Dulce de Leche Ice Cream
3 cups of half & half
1 13.4 oz can of dulce de leche, plus more for topping
2 vanilla beans, seeds removed
In a large saucepan, heat the half & half over medium heat until nearly boiling. Remove from the heat and whisk in the dulce de leche until dissolved, and then stir in the vanilla bean seeds. Transfer the mixture to a large bowl, cover with plastic wrap and refrigerate until cold or overnight.
Place the mixture into your ice cream maker and freeze according to the machine’s instructions. Most machines take 20 to 40 minutes to make ice cream. When the ice cream is thick and creamy, place into a freezer-safe container (with piece of parchment paper between the ice cream and the lid) and let it harden for a few hours. Let it sit at room temperature for a few minutes before scooping. Top with lightly melted dulce de leche and eat.
*Thanks Wendy!
Midweek Meltdown: Blackberry Ice Cream
Posted: July 17, 2013 Filed under: desserts, eggs! | Tags: berries, blackberries, eggs, food, frozen treats, ice cream, recipes, summer food 11 Comments
purple makes me happy
It continues to be hot. Like H-O-T hot. I feel like I’ve been melting, or on the verge of melting, for weeks. Which is good and bad when ice cream is involved. You want your ice cream cold and tasty, but not too cold that you can’t eat it without a dreaded brain freeze. And then you don’t want it too melty so it turns into a big drippy mess and gets all over your face and clothes, or whatever else happens to be around, like your iPhone, or your cat.
These are the things I was thinking about when I was making my latest batch of ice cream. This time I’ve gone the fruity route, using blackberries, those darker, richer cousins of raspberries and strawberries.
I really love the color of this ice cream, it’s such a happy purple. It just makes me smile. It’s like staring into a bowl of Grimace or something. Wait, is that weird? Forget I said that. The heat has gotten to me. It’s nothing like a bowl of Grimace. It’s sweet and creamy and berry good … and might just be one of the tastiest varieties I’ve made.
Blackberry Ice Cream
2 pints of blackberries
1 1/4 cups of sugar
2 tablespoons of lemon juice
3 cups of half & half
5 large egg yolks
In a medium saucepan, combine the blackberries, 1/4 cup of sugar and the lemon juice. Simmer over low heat until the blackberries have broken down and are syrupy, about 20 minutes. Next, pour the mixture through a fine-mesh strainer into a large bowl, using a spoon or spatula to get as much of the liquid through as possible. Discard the remaining pulp and seeds and let the liquid cool.
In another saucepan, heat 1 ½ cups of half & half and 1 cup of sugar over medium-low heat. Meanwhile, whisk the egg yolks in a bowl until pale yellow and thick, about 3 minutes. Gradually add some of the warm half & half mixture into the egg yolks while whisking constantly. Then pour the egg-half & half mixture into the saucepan and continue cooking over low heat, stirring constantly, until the mixture thickens and can coat the back of a wooden spoon, about 5 minutes.
Add the remaining 1 ½ cups of half & half to the blackberry mixture, and then add the egg-half & half mixture and stir to combine. Cover with plastic wrap and refrigerate until cold or overnight.
Place the mixture into your ice cream maker and freeze according to the machine’s instructions. Most machines take 20 to 40 minutes to make ice cream. When the ice cream is thick and creamy, place into a freezer-safe container (with piece of parchment paper between the ice cream and the lid) and let it harden for a few hours.

i color coordinate my ice cream and ice cream containers
Let it sit at room temperature for a few minutes before scooping, and then eat.
Midweek Meltdown: Strawberries & Cream Popsicles
Posted: June 19, 2013 Filed under: desserts | Tags: berries, dessert, food, frozen treats, Greek yogurt, popsicles, recipes, strawberries, summer food, Zoku 1 Comment
super-cool
Okay, if you’re keeping track, this is technically not ice cream as well, but it is frozen and delicious and a summertime favorite. And it gave me the chance to try out my new super-cool (har-har) Zoku popsicle maker. If you don’t know what that is, then you’re in for a real treat. It’s this magical little invention that freezes popsicles right on your counter in 9 minutes or less. I know! I could hardly believe it myself until I tried it myself, and literally 9 minutes later I was enjoying a strawberries and cream popsicle. Don’t skip the first step – letting the berries sit with the sugar and vanilla makes them soft and juicy. And the Greek yogurt adds some subtle tang, but if that’s not your thing you can use regular yogurt.
Strawberries & Cream Popsicles
1 lb of strawberries, hulled & diced
4 tablespoons of sugar
1 tablespoon of vanilla
1 cup of Greek vanilla yogurt
Place the strawberries in a bowl along with the sugar and vanilla, and let stand for about 15 minutes until juicy. Place into a blender, add the yogurt and mix until smooth. Pour into popsicle molds (or your properly frozen Zoku machine) and let freeze. Then enjoy.
Midweek Meltdown: Frozen Key Lime Pie
Posted: June 5, 2013 Filed under: desserts, eggs! | Tags: dessert, eggs, food, frozen treats, key lime pie, lime, pie, recipes, summer food 11 Comments
easy as pie
While technically not ice cream, this pie IS frozen, and basically has the same ingredients as ice cream, so I’m qualifying this as a meltdown. And even for people who don’t like pie (this guy) this one is a real treat. I’ll let you in on a little secret too — I’m spilling a lot of them this week — I don’t use regular graham crackers for the crust. I use honey-flavored Teddy Grahams. So, I throw those poor innocent bears into a food processor and pulverize them into little crumbs. If that offends anyone, I’m sorry. But just like the brave limes in this pie, they really do sacrifice their lives for a good cause. As a result, this frozen pie has all the necessary flavors of the perfect summer dessert: zesty, creamy, sweet and, if you leave it out in the sun for too long, melty.
Frozen Key Lime Pie
For the crust:
2 cups of graham cracker crumbs
6 tablespoons of butter, melted
For the filling:
6 large egg yolks
1/4 cup of sugar
1 14 oz can of sweetened condensed milk
2 tablespoons of lime zest
3/4 cup of lime juice (about 4 to 5 limes)
For the topping:
½ pint of heavy cream
3 tablespoons of sugar
½ teaspoon of vanilla
Heat your oven to 350º.
For the crust, combine the graham cracker crumbs and melted butter in a bowl. Press into a 10 inch pie dish, making sure the sides and bottom are even thickness. Bake for 10 minutes, and then allow to cool completely.
For the filling, beat the egg yolks and sugar on high until thick, about 5 minutes. On medium speed, add the sweetened condensed milk, lime zest and lime juice. Pour the mixture into the baked pie crust, cover with foil and let freeze overnight.
For the topping, beat the heavy cream on high until soft peaks form. Add the sugar and vanilla and beat to combine. Spoon over the top of the pie and allow to freeze several hours. Cut into slices and then eat.
Midweek Meltdown: Mint Chocolate Chunk Ice Cream
Posted: May 22, 2013 Filed under: desserts, eggs! | Tags: chocolate, eggs, food, frozen treats, ice cream, mint, recipes, summer food 9 Comments
excite-MINT
Guess what, people? Meltdowns are back! And since the official start of Summer is this weekend, it seems like the right time for it.
Even after making 8 different flavors of ice cream last year (plus 1 sorbet and 1 gelato), I didn’t make one of my favorites: mint chocolate chip. I’m really glad I did now, because the combination of herby mint and rich, dark chocolate is one of the best flavors ever. I wasn’t going to add food coloring, but my brain couldn’t process “mint” without that traditional green hue. But I do like the way the brown chocolate blends with the minty green in the finished product. Tastes pretty good too.
Mint Chocolate Chunk Ice Cream
4 cups (1 quart) of half & half
5 large egg yolks
3/4 cup of sugar
Pinch of salt
1 teaspoon of vanilla
1 ½ teaspoons of mint extract
Green food coloring (optional)
3 oz of dark chocolate mini chunks
In a large saucepan, heat the half & half over medium heat. Bring to a simmer, stirring occasionally.
Whisk the egg yolks in a large bowl until smooth. Gradually add the sugar and salt, and whisk until the mixture is pale yellow and thickened, about 3 minutes. Slowly add a little of the heated half & half into the egg mixture and whisk together. Pour the egg-half & half mixture into the saucepan and continue cooking over low heat, stirring constantly, until the mixture thickens and can coat the back of a wooden spoon, about 5 minutes.
Remove from the heat and pour through a fine mesh strainer into a large bowl. Stir in the vanilla and mint extract, and about 4 drops of green food coloring, if using. Cover with plastic wrap and refrigerate until cold or overnight.
Place the mixture into your ice cream maker and freeze according to the machine’s instructions. Most machines take 20 to 40 minutes to make ice cream. When the ice cream is thick and creamy, add the dark chocolate mini chunks to the machine, or stir them in by hand. Place into a freezer-safe container (with piece of parchment paper between the ice cream and the lid) and let it harden for a few hours. Let it sit at room temperature for a few minutes before scooping, and then eat.
Pecan Turtle Power
Posted: April 9, 2013 Filed under: cookies, desserts, eggs!, sauces & gravy | Tags: caramel, cookies, eggs, food, peanut butter, pecans, recipes, salted, toffee, turtles 8 Comments
cowabunga!
Everybody knows what turtles are, right? No, I’m not talking about those shelled reptiles, regular and/or the mutant ninja variety, although those are all pretty awesome. I mean those incredible chocolate-covered clusters with caramel and nuts. It’s the type of treat usually found at quaint candy shoppes alongside homemade fudge and peanut brittle. But if you don’t live near one of these shoppes, they can be hard to find. So in a totally radical move, I decided to reinterpret those candies into cookie form. And add peanut butter, toffee and – since it’s National Pecan Month! – some pecans. Dude, I know. I have a slight obsession with making cookies that include every flavor under the sun. I also made my very own salted caramel sauce because, well, why not? It’s way easier than you could imagine, and makes for a bodacious treat all its own.
Pecan Turtle Cookies
For the cookies:
½ cup of unsalted butter, softened
½ cup of sugar
½ cup of brown sugar
2/3 cup of chunky peanut butter
1 large egg
2 cups of all-purpose baking mix
1 cup of milk chocolate toffee bits
1 cup of salted caramel sauce (see below)
1 cup of pecan halves
2/3 cup of semisweet chocolate chips, melted
For the salted caramel sauce:
1 cup of sugar
4 tablespoons of unsalted butter, softened and cut in pieces
½ cup of whipping cream
2 teaspoons of Maldon flaky sea salt
Heat your oven to 350º.
In a large mixing bowl, cream the butter, sugars and peanut butter until light and fully. Add the egg and beat until smooth. Add the baking mix a little a time until well combined, scraping down the sides as needed. Stir in the milk chocolate toffee bits.
Roll the dough into tablespoon-sized balls, place on an ungreased cookie sheet and then flatten with the bottom of a glass (or your fingertips). Bake for 10 to 12 minutes, or until golden brown. Transfer to a wire rack to cool.
Meanwhile, make the salted caramel sauce. Place the sugar in a saucepan and cook over medium-high heat. When the sugar starts to melt (keep an eye on it – it could burn quickly), whisk to remove any clumps. When the sugar turns a deep amber color, carefully whisk in the softened butter. Remove the pan from the heat and whisk in the cream until smooth. Then whisk in the sea salt. Let the caramel cool to room temperature, and then place in the fridge to cool completely. The sauce will thicken as it cools, but should still remain sticky and liquidity. (Any unused sauce can be kept covered in the fridge.)
Once the cookies are cool, pour a spoonful of salted caramel sauce over each one and top with one or two pecan halves. Drizzle with melted chocolate chips and let set.
Drink Me, I’m Irish Coffee
Posted: March 17, 2013 Filed under: desserts | Tags: coffee, dessert, food, ice cream, Irish, milkshake, recipes, St. Patrick's Day, whiskey 6 Comments
whiskey & cream
Happy St. Patrick’s Day, folks. Even after a day of drinking you still need to satisfy your sweet tooth, right? This frozen twist on the classic Irish coffee certainly does the trick. Sláinte!
Irish Coffee Milkshake
– 1 cup of coffee ice cream
– 1 cup of milk
– 1 shot of Jameson Irish whiskey
– Small bar of chocolate, for garnish
In a blender, combine the ice cream and milk and blend until smooth, or the consistency you prefer. Add the whiskey and pulse to mix. Poor into a glass and top with grated chocolate. Pop in a straw and enjoy.
